Saturday, February 27, 2010

Base Earth Color, Roadbed, and Track

I'm going to post this update with things grouped together, but I seem to have developed a "random" style to completing things, and so it's not necessarily in the order that I've done them. The reason for this is because I start to do a task, the step I think I'm on, and then realize I need to do another part of the layout first before I can finish the task I'm doing. And of course when I start doing this other thing, I realize I need to do some other things. And so on. As long as everything is getting done, I'm not too worried about it.

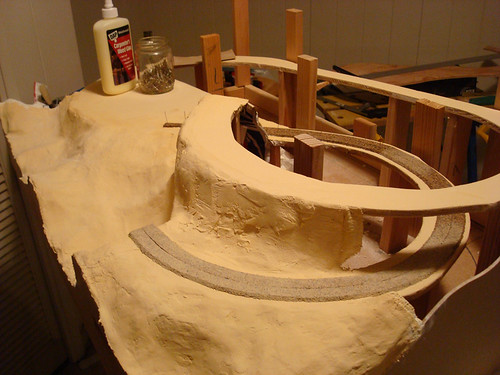
You saw the plaster coat from last time. It is now painted my base desert earth color.

DSC03310

Here's a closeup looking around the bend in the lower right hand side of the layout. (Side note: I should give this a name perhaps). You can see that in addition to painting the plaster coat, I've also laid down cork roadbed for the track to be layed on.


DSC03309

The scenic location and look that I've picked for the railroad I've narrowed down to the northern part of Arizona. Here are some shots about what I have in mind for the terrain theme for this layout:


I've been asked if there will be cactus -- Yes, there will be a little cactus here and there, but not overwhelmingly so (as in a stereotypical way).

The cork roadbed extends all the way into what will become the tunnel.

DSC03308

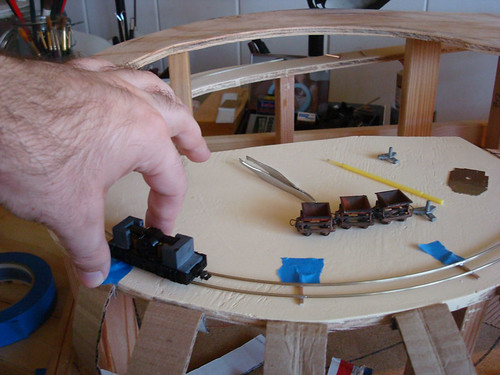
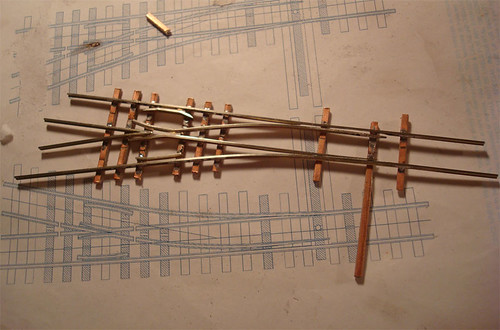
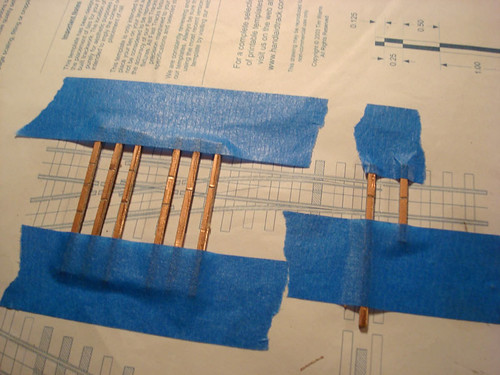
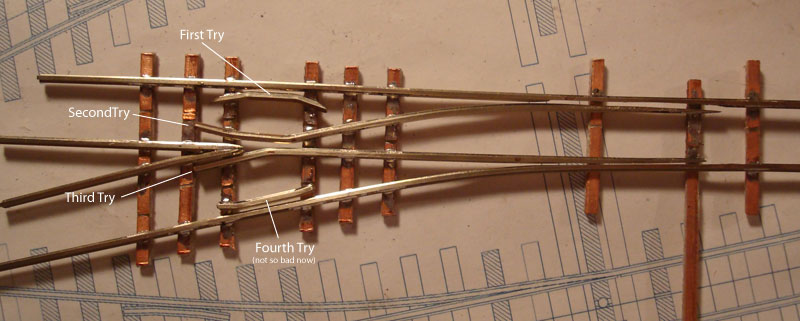
And of course how could it be a model railroad layout without track? I've begun to lay this section of track.

DSC03313

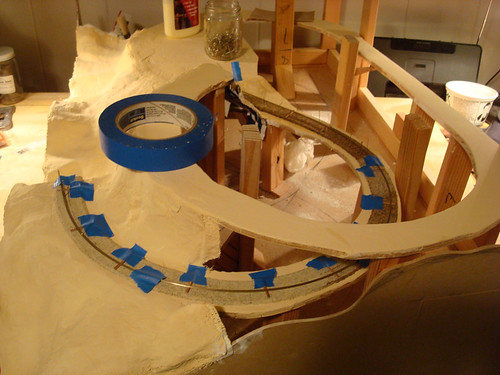
The track and ties are held in place with one of my favorite materials -- blue painter's masking tape (the low-tack stuff). The rails are pre-bent before installation, but are still a touch springy. In these cases I've started using pins to help them keep their shape while I work on them.

DSC03315

Leilani recorded a short video of how exactly the track is made, for those of you who were wondering.


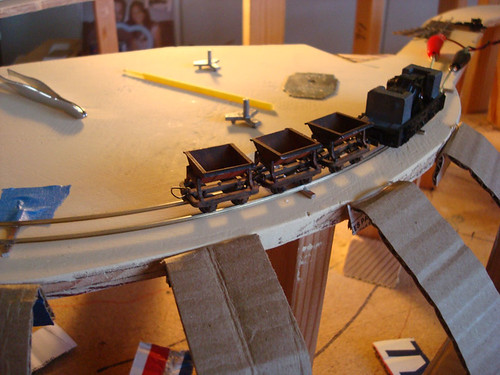
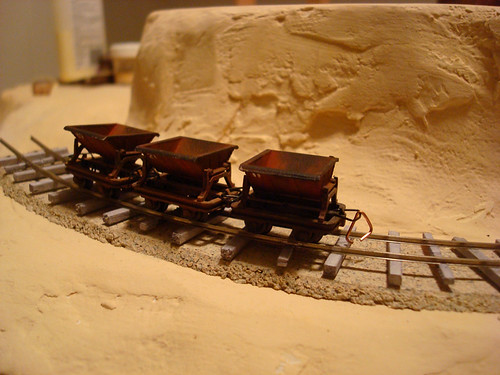
Here the subtly rusted tippers sit, waiting for a train to pick them up for the next ore haul...

DSC03319-(2)

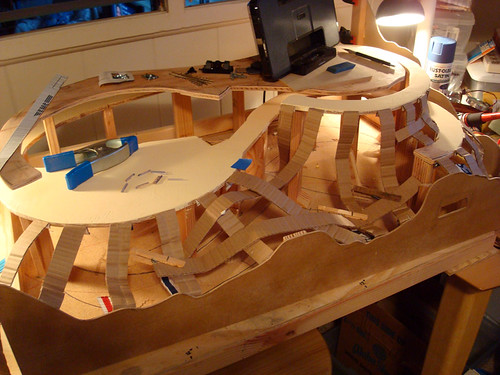
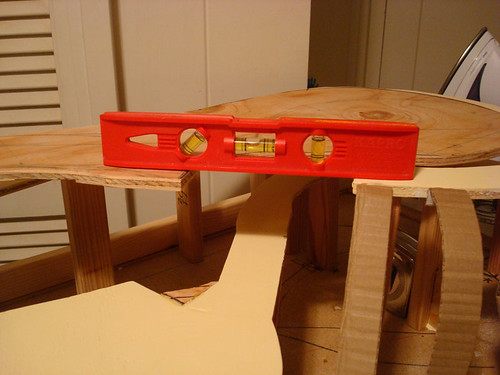
I've begun to build the tunnel liners as well. These will be basically cardboard, that's painted black, which will serve as the walls of the tunnel. Here they're just raw cardboard, and I'm dry fitting them to make sure the train can pass through without banging into the walls.

DSC03330

For this particular tunnel, I'm planning on building a wooden tunnel entrance and wooden tunnel lining, like you'd expect from a mining railroad.

Lastly, I layed out some more roadbed, leading into the tunnel on the left, along with dry fitting some of the track.

DSC03336

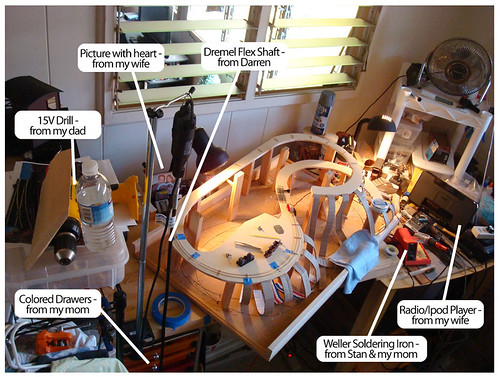
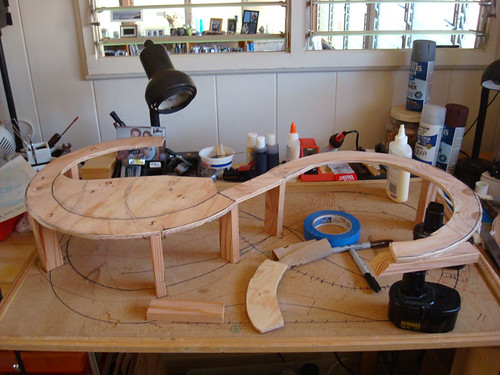
Here's the overall progress of the layout up to this point...

DSC03338

Tuesday, February 23, 2010

Terrain Forming Has Officially Commenced

I'm getting asked two questions frequently:
  • Why did you stick all those strips of cardboard on there?
    -AND-
  • Why did you put the fascia on now. Doesn't that go on at the end?
Well my friends today your answer has arrived.

It's a matter of order of operations (though there's a high probability that I forgot something and will realize it later and wish I had done that first). I didn't want to permanently mount the track if I knew I was going to be plastering right next to it. It's possible, of course, but I didn't want to risk it if I had the choice. So instead I decided to do the outer terra-forming first, before mounting the track. Then I could lay down the track in confidence.

On a larger layout there would have been more of a shoulder on the wooden trackbed, but because this is a very small layout it made more sense, in my opinion, to terra-form first where possible.

Terra-forming can be done in different ways, but with wood I choose to go the cardboard strips + plaster gauze route. The first step is to establish a web of cardboard strips that give the basic shape of the earth:

DSC03293

It first starts with the vertical strips (or vertical-ish strips). The strips run from the wooden track bed down to the fascia! Tada -- there's the answer to the first two questions. In order to create the terra-form web, I needed to attach cardboard strips to the front fascia.

Once the vertical-ish strips are in place, horizontal-ish strips are woven into them.

I used my mom's old crafting hot glue gun to glue it all together. While the hot glue is drying, they're held together with clothes pins:

DSC03297

When all is said and done, the cardboard strip webbing should look like this, leaving about 1.5" squares of openness:

DSC03298

Once the cardboard strips are in place, plaster gauze is laid over them. The plaster gauze is a crafter's product that originated as cast-making material. Doctors offices could order gauze that had dried plaster attached to it. It enabled them to make a cast by simply wetting the plaster gauze and applying it to the patient.

Well some government organization that regulates things like this regulates that they are only allowed to be so old, and then the doctor's office must dispose of them. Those surplus, "expired" casting gauze started making it's way to crafters. Soon it became a hot item and craft supply stores began to offer non-sterilized versions.

I actually picked up 8 rolls off of ebay for $25 (that's about 5 cents a square foot). On a side note, it was being sold by a "baby memory" seller who was offering it to expecting mothers to make a plaster cast of their pregnant belly. Fortunately, when it came into work it wasn't marked as such and was in a plain'ol USPS box.

Anyways, the gauze isn't 100% covered in plaster, so after the strips are wet and laid down on the cardboard web, they look as this...

DSC03299

I'm not sure if you can tell, but there are small holes in it (holes like gauze would have holes).

However, if you rub your finger across it, you can smooth out the plaster. I did a 2nd coat of plaster gauze, as I was planning to do, and on the 2nd coat smoothed everything out, giving me the final terra-form base:

DSC03302

TA-DA #2! The first land form has taken shape.

I plan to go back with an x-acto knife and spackle and clean up where the fascia and plaster mountain meet, then paint it with a coat of my base desert earth beige color.

There's also something neat I'm building which shows up on the edge of a couple pictures which I'll post about later this week (probably a video along with it).

Oh yeah, and under the terra-form, it's very professional looking...

DSC03301

On a side note, I'm actually building this layout on an old bulletin board that my mom used to use to block her puppy dogs into a certain part of the house. It has dog scratches all over it, and at one place on the bottom they actually peed on it. Good thing that part is getting covered up...

Saturday, February 20, 2010

Fascia

Alright, I'm done working on it for today. I drew, cut, and mounted the fascia (fā'shē-ə) for the front and back. Actually, only the front one is mounted. The back on is sitting on it's mount right now, so it's about 3" taller than it will be when it's finally mounted. The back open area (non-tunneled) will be the Applewood Canyon, as seen on the original layout plan.

fascia

The square hole in the bottom right is an access hole for the electronics. A panel will be mounted over that which has the power switch and plug for the throttle (controller).

Can you start to visualize it from the plan?

Lani's Railroad

First Running Track

TADA! It's not an update about the benchwork.

track3

I got tired of having pieces of wood and no trains so I started to put together some of the trackwork for the LANI railroad. I started on the section that will be mostly inside a tunnel for obvious reasons.

track2

The track is made by soldering the metal rail to a PCB tie which is a wafer like material that has a coat of copper on the outside. The rail is soldered to the copper surface and held in place quite nicely. This is as opposed to using miniatures spikes and spiking the rail down with those (uh, I'd rather solder, thanks).

track1

After a decent section of rail has been soldered down, gaps are cut in the copper surface of the ties to not short circuit the electrical connection. The gaps can either be cut with a small triangle hobby file or by tapping a cut-off wheel from a dremel on the surface (you can guess which I did).

track4

When all is said and done, this section of track will actually be coming out of a tunnel right about... here. The area where the tweezers and tools are sitting right now will be a small town.

I put together a short video of the train (if you can call that black chassis without a shell a train) running on the track...


This handlaid track has been brought to you by....

The letter U...

The number 8....

And this soldering iron...

weller

On a side note, I took a picture of my overall work area, and realized a number of things I have were given to me by friends and family...

workarea-comments

Terrain Form Showing Up

In addition to the benchwork coming together, some terrain has started forming as well...

bench4

It won't be plastered over until all the benchwork and pylons are in place though. But I installed it now in case it's harder later. I'm planning on mounting a fascia of 1/8" MDF all the way around which the cardboard strips will be attached to to finish their form. Hence why they're going on now, since it'll probably be easier.

Only 1 to 2 more pylons are needed and the support for the upper deck will be complete!

bench5

Oh, what's this? A level bridge connection.... ?

bench6

A view I haven't shown before. The bottom left turn will be hidden in a tunnel which will pop out on the bottom right turn.

bench7

Again With the Benchwork

I troweled a layer of spackling over top of the wooden base and smoothed everything out. I also picked up a quart of sand-ish colored latex paint which will be my base earth color....

bench3

You can see some of my reference photos that I'm collecting too (thank you flickr!).

I had also picked up a new DC throttle off of ebay. Yeah, yeah, I know DCC is the rage, but it's expensive and this layout isn't exactly a multi-engine operating estate. DC is fine, and as long as it runs the engines reliably and slowly I'm happy.

throttle

The Varipulse 851 is supposed to do just that. It seems picky about how clean the track is and also how well the motor of the engine is in condition. I've gotten a better feel for it, and I get pretty decent results, though it can stutter or stall on a dirty spot of track.


More on the Benchwork

It's kinda starting to become visible what it might be like. There will be a bridge there, where the gap is (and the train is sitting)...

bench1

The train will snake down the backside of the layout.... part of this will be in a tunnel (hopefully)

bench2

Benchwork Video

I took a short video giving a "3D" tour of the benchwork at this point and time (about a week ago)...

Sunday, February 14, 2010

Custom Sized Turnouts in HOn30

The two things that drew me to handlaying track, particularly turnouts was...
  1. Cheaper -- Hand laid turnouts only end up using about $2-$3 in materials, as opposed to spending $18-30 for a store-bought turnout.
  2. Custom -- You can make things that you can't buy
Both reasons were important things for me as I'm building the LANI R&R. I'm already running a small layout with tight turns and I needed turnouts that can keep up.

hon30-handlaid-turnouts

On the left is a #4 turnout which is about the smallest turnout that's available commercially for HOn30 (and more or less for N scale). On the right is a #2-ish (around there) turnout that was created off of a template I drew on a computer.

Understanding, it's limited in operation. Larger equipment (engines with more than 6 wheels) will probably not be able to make that tight of a turn. But since I'm only planning on running 0-4-0 and 0-6-0 engines on LANI R&R, it works perfect. The main difference aside from the height is the angle at which the deviating track deviates away.

Saturday, February 13, 2010

Beginning to Come Together

Last night and later this afternoon I put in some more time on the wooden roadbed. It's starting to really come together now! Because the bottom layer will have to be built before the upper layer can be installed over it, I think it's starting to get close to the time where I start dealing with track and scenery sub-structure....

2 ore hoppers sit, waiting for track to be installed so they can get to work...
Hoppers waiting...


Checking the height of the overpass in a very loose fashion. A side from an unfinished Railway Recollections Excursion Car is held in place to eyeball clearance. It will be a little higher with the track, but not by much.
Checking the height

Friday, February 12, 2010

Hand-Built HOn30 Turnout

My order from Fast Tracks finally came in today (from air mail canada). I had ordered some PCB cross ties for laying my own track. And of course since my order from Nscalesupply.com came in last week, it was time to try it all out (after a quick trip to the hardware store for some acid paste flux).

And the result is....

TADA!
point1

Three and a half hours, 1 piece of rail, a small bit of solder, and a lot of filing! It's my first hand-laid track ever (and it happens to be a turnout at that).

It's really bad. The main track flangeway guard rail isn't fully laid flat. The switch points aren't quite the right shape to make a nice contact. And the frog point is kinda wonky. BUT it is in gauge, and the deviating track's guard rails are pretty close to NMRA spec.

point2

Well, whatever the case I'm pretty happy just to have had the experience and to be able to say I've at least built one. I'm hoping my next turnout will be a lot better (and functional).

I'm actually laying these more or less by hand using a paper template. I use blue painters tape to temporarily hold things in place. If it looks like it would be easier using this method, it's not. In fact, the tape isn't quite as good as say if I had a third hand.

point0

Even though the quality is pretty bad (cars will derail going hitting the guard rail on the main track) I can see some progression in my ability to be more precise. Here's a timeline of some of the pieces made. Hopefully it shows a progression in quality...

point3

Maybe next post I'll be showing you all a completed, working, and well-made turnout.

In case you were wondering exactly how big is this turnout....
size

One last thing: If you're wondering about the globs of solder, they're relatively flat and won't show up when painted. As seen here is not the final product. A turnout would have the remaining crossties added and be painted after installation.

Some Trackage...

I layed out some ties on the upper level deck to get an idea how the scene would come together....
ties3


Hmmm.... is this a good color for my ground coat....
color

Monday, February 8, 2010

Benchwork Update: Lower Level Kinda There

Well I cleaned up the cut track bed, and began to make the risers that will hold the track bed up....

risers

I'm somewhat worried I might have to redo parts of this as it's not super amazing. Then again, it will be covered over with scenery and it might not matter.

The main problem that I'm facing is that when I cut the track bed, I left a reasonable shoulder on either side of the track. And, well, as it turns out, this only leaves about 1.75" for the scenery between the lower "town" track and the forward rising track. Considering that to represent a cliff on either side would take about an inch each, it's sorta leaving a problem there. Basically, with the width of the rails, plus the width of the crossties, plus the shoulder that I cut for the wooden track bed, there is a *lot* of space being taken up that I hadn't planned for.

Nice!

The good news: The wood was cheap and I haven't layed down any track yet. This might have been just a $12 mistake. Let's hope so.

Friday, February 5, 2010

Benchwork Update: Cut the Risers

The skill saw met the plywood this evening, rendering a handful of very rough cut shapes (see below). This was my first time cutting any sort of shapes with the saw. Overall after I got the hang of it, it didn't seem to go so bad. You can see the mistake I made in the bottom right corner, buuuuuut it will be covered up with scenery eventually anyways.

Since this was my first time not only cutting by designing these types of shapes, I need to do some more trimming tommorow. You can see the areas I need to cut off indicated on the pieces. After that I plan to sand down the very rough edges and overall get them nicened up and ready to work with.

plywood

Thursday, February 4, 2010

Benchwork

Oh, what do we have here....
DSC03076

DSC03080

Ah yes, the benchwork has started! It's a bit late tonight to cut the wood, but I'll be bringing out the saw tomorrow afternoon. Can't wait to see how it comes out. This will be my first time doing the risen plywood benchwork method. I've only messed with beadboard styrofoam in the past.

Also, my HOn30 ore tippers came in from ebay. I was very happy with them. They will be the primary freight being pushed around the layout.
DSC03079

Tuesday, February 2, 2010

Choosing a Tie Color

ties

Well I've been messing around with deciding on what method I'm going to use to prepare the hand laid ties for the railroad. Here are some of my experiments thus far.

White Wash = 1:1, white acrylic paint:water.

Rit Black = Rit Black Fabric dye, diluted heavily with water

Rit Brown = Rit "Dark Brown" Fabric dye, diluted heavily with water

Custom Weathering Solution = Maple acrylic stain, windshield wiper fluid, gray acrylic (covered in a 7/8n2 SE Lounge post by me last year).

The Experiments
  1. The raw tie, un-modified

  2. White Wash + Once over with Rit Black (This technique was popularized here by Pacific Coastair Line On30)

  3. White Wash + Twice over with Rit Black

  4. White Wash + Once over with Rit Black + Once over with Rit Brown

  5. White Wash + Once over with Rit Black + Twice over with Rit Brown

  6. Dipped in straight Rit Brown

  7. Custom Weathering Solution

  8. Custom Weathering Solution + Once over with Rit Brown
I was originally leaning very strong towards #2, and actually produced about 30-40 ties in this color. But after looking at them in bulk, I'm not sure if that's the color I want to go with.

I'm pondering weathering them to the "sun bleached" look of #2 as intended, then once laid doing a light mist of Testor's Light Earth to simulate the dusty environment they've been living in.

ties2